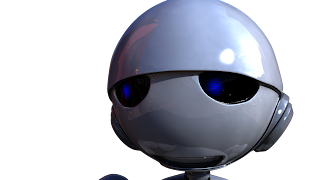
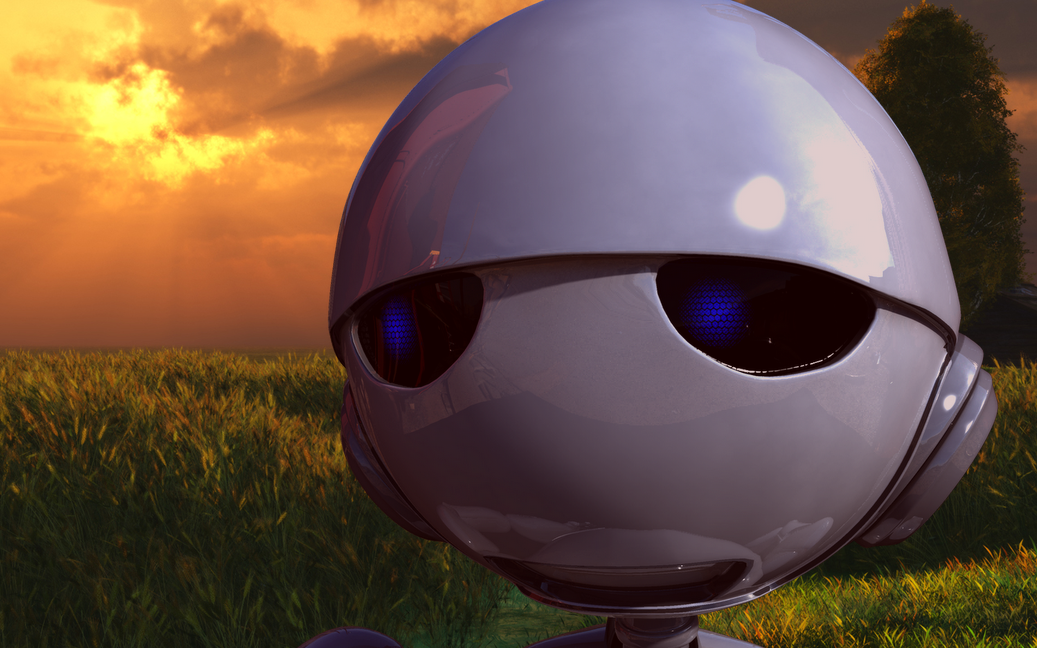
Here is the script for my final. It will take a maya scene, batch render the animation, and composite it over a background image. You can scale the background image however you want, color adjust the foreground animation, and position the animation where you want. The read-me goes into a little more detail. The tools required for the script are Maya (to batch render an animation), Imagemagick (to composite animation over background, plus additional options), and FFMPEG (to compile frames into a movie).
Overall I'm pretty happy with the script. Unfortunately I didn't have time to render out something really impressive with it, but it certainly has the potential to make cool stuff. The script should work with any maya scene or background image you give it, but to make the composite look really good you need to do more work in Maya, such as lighting and rendering. If I had time I would have liked to allow the script to use the background image to automatically create any reflections or color correction in the animation. For example, if there was a shiny robot walking around in a red room, it would be cool to have the red spill onto the robot. This is why I included the option to color adjust the animation, so people could mimic this in way.
I also would have liked to have visited Joe and see what I could have done to make my script better, but my schedule was too crazy (I have Haley postproduction to thank for that). However, I was able to solve my problems and issues without much help, thankfully. I did get some tips from classmates over the past couple weeks though.
Attached is everything you should need. It has the script plus a sample maya file, a sample background image, a read-me, and an example of what the output should look like.
http://www.mediafire.com/?oyw910kpgbjl4f7
Friday, May 13, 2011
Wednesday, May 11, 2011
Journal Post 13 - final proposal
This is the script I've been working on for my final. As of now it takes a movie file, extracts the frames, composites each frame on top of another image, then puts the frames back into a video again. The movie file has to have transparency for this to work well, so animations rendered out of Maya are great. I want to eventually get it so I can batch render out of Maya directly from the script, then composite everything.
Joe and I talked about adding shadows with Imagemagick, but I think I will just use Maya for that. I'll allow the user to render out any lighting they have in the scene. I might have to render out a separate shadow pass, but I'm not sure yet, I'll play around with stuff. I was thinking of also adding an option for the user to color correct the video frames, in case they needed to match them with the background. When I'm done with the script there will be three programs that it uses. They are:
- Maya (batch rendering)
- Imagemagick (compositing, color correct)
- FFmpeg (frame compiler)
Code:
#!/bin/bash
MOVIE=$1
BACKGROUND=$2
OUTPUT=$3
FRAMERATE=$4
echo "script: $0 - Arguments: << input file name >> << background file name >> << output file name >> << framerate >>
Thursday, May 5, 2011
Assignment 4.3
Here is my finished script for the test last Thursday. It takes in five arguments. The first is the file name of the video you want, the second is the name you want the output video to be, the third is the framerate, and the fifth and sixth allow you to add frame numbers and/or added contrast to the frames. You have to type "frames" to add frame numbers and "effect" to add the contrast effect. The instructions are also included in the script. An example would look like this:
./script.sh input.mov output.mp4 24 frames effect
My script is below. I should mention that it takes a long time to render, so you might want to try it out on a very short video clip.
#!/bin/bash
#arguments
MOVIE=$1
OUTPUT=$2
FRAMERATE=$3
TEXT=$4
EFFECT=$5
echo "script: $0 - Arguments: << input file name >> << output file name >> << framerate >> << print frames. must type 'frames>> <
#apply effect and/or frame numbers
for IMG in $IMAGES
do
if [ "$EFFECT" == "effect" ]; then
echo "$IMG rendering..."
convert $IMG -fx "(1.0/(1.0+exp(10.0*(0.5-u)))-0.006693)*1.0092503" $IMG
#convert -fill 'rgb(50, 0, 100)' -colorize 50% $IMG $IMG
fi
if [ "$TEXT" == "frames" ]; then
echo "$IMG adding frame numbers…"
convert $IMG +repage -fill White -pointsize 50 -gravity "South" -draw "text 1,0 'frame $FRAME'" $IMG
fi
FRAME=$(expr $FRAME + 1)
done
#make video from new frames
ffmpeg -i %05d_frame.png -r 24 -b 2000000 -vcodec libx264 -vpre hq -vpre normal $OUTPUT
#get rid of temp directory
mv $MOVIE ..
mv $OUTPUT ..
cd ..
rm -rf Frames_TEMP
Monday, April 25, 2011
Journal Post 13
I started playing around with Imagemagick. I took an image and added a slight red tint to it:
convert -fill 'rgb(100, 0, 0)' -colorize 20% DC_eyes.png DC_colored.png
I then decided to composite it over another image:
composite -gravity center DC_eyes.png midastouch_1280x800.jpg midastouch_1280x800.jpg
The foreground was a bit too small though, so I had to scale down the background:
convert -resize 1152x648 -quality 100 midastouch_1280x800.jpg background.png
Then I composited the two images again:
composite -gravity center DC_colored.png background.png background.png

Monday, April 18, 2011
Journal Post 12
I've decided to check out if being red/green color blind actually helps with spotting camouflage. I used my script on about a dozen pictures with some kind of military camo. At first there wasn't any significant change in the pictures, but I eventually came across a couple that actually made camouflage stick out from its surroundings. It's pretty interesting, all the surrounding foliage and trees will have a yellowish tint while the camo will have a bluish tint.
I tried investigating why these couple images worked out. It seems that the greens that have a hue above 90-ish become more blue and greens that are below that become more yellow. For example, in the first image below the camouflage has a hue range of about 90 - 100, and the surroundings are between 80 and 90. It's not a huge difference, but after you apply the color blind script to it the difference becomes much bigger. The foliage becomes a value of about 60 while the camo is around 240.
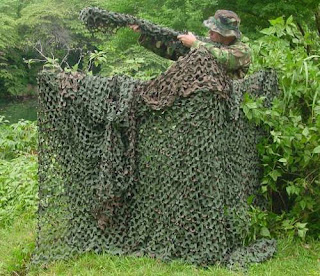

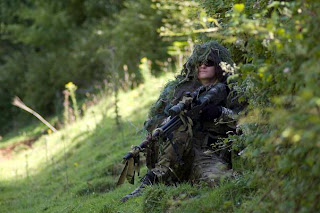

I tried investigating why these couple images worked out. It seems that the greens that have a hue above 90-ish become more blue and greens that are below that become more yellow. For example, in the first image below the camouflage has a hue range of about 90 - 100, and the surroundings are between 80 and 90. It's not a huge difference, but after you apply the color blind script to it the difference becomes much bigger. The foliage becomes a value of about 60 while the camo is around 240.


Sunday, April 17, 2011
Journal Post 11
I made a simple script that takes a sequence of photos and combines them into a movie using ffmpeg. Donovan actually showed me the script, then I made a version specific to my computer. It's really basic, but it's been a big help so far working on the Haley film. I often have to render out my current progress on composites and post it to the Haley blog. Before I would render out my composite as a png sequence and then import to After Effects. Using ffmpeg quickens that process by a lot, plus the file size is super small. It will create a 1080p clip that's only around 1mb, without loosing any quality that I can tell.
Script:
#!/bin/bash
cd ~
cd /Users/Colin/Haley/2-16/png2
ffmpeg -i Scene2_shot_16_1%03d.png -r 24 -b 2000000 -vcodec libx264 -vpre hq -vpre normal test.Scene_2_1.mp4
Script:
#!/bin/bash
cd ~
cd /Users/Colin/Haley/2-16/png2
ffmpeg -i Scene2_shot_16_1%03d.png -r 24 -b 2000000 -vcodec libx264 -vpre hq -vpre normal test.Scene_2_1.mp4
Monday, April 11, 2011
Assignment 4.1 (complete)
Part 2
Here's the code for the color blind script I finally finished. I believe this is what you call a Deuteranopia color blindness, affecting someone's ability to distinguish red and green. What I did was create 2 copies of the background layer then use a channel mixer to make a red and green channel from the copies of the original image. I then merged them together and set them as the new red and green channels.
//Color blindness
var curDoc = activeDocument
//create the layer for the red channel
var layerRed = curDoc.artLayers.add()
layerRed.name = "Red Channel"
curDoc.artLayers["Background"].copy()
curDoc.paste()
//channel mixer
var idChnM = charIDToTypeID( "ChnM" );
var desc30 = new ActionDescriptor();
var idpresetKind = stringIDToTypeID( "presetKind" );
var idpresetKindType = stringIDToTypeID( "presetKindType" );
var idpresetKindFactory = stringIDToTypeID( "presetKindFactory" );
desc30.putEnumerated( idpresetKind, idpresetKindType, idpresetKindFactory );
var idUsng = charIDToTypeID( "Usng" );
desc30.putPath( idUsng, new File( "/Applications/Adobe Photoshop CS5/Presets/Channel Mixer/Black & White with Red Filter (RGB).cha" ) );
executeAction( idChnM, desc30, DialogModes.NO );
//create the layer for the green channel
var layerGreen = curDoc.artLayers.add()
layerGreen.name = "Green Channel"
curDoc.artLayers["Background"].copy()
curDoc.paste()
//channel mixer
var idChnM = charIDToTypeID( "ChnM" );
var desc4049 = new ActionDescriptor();
var idpresetKind = stringIDToTypeID( "presetKind" );
var idpresetKindType = stringIDToTypeID( "presetKindType" );
var idpresetKindFactory = stringIDToTypeID( "presetKindFactory" );
desc4049.putEnumerated( idpresetKind, idpresetKindType, idpresetKindFactory );
var idUsng = charIDToTypeID( "Usng" );
desc4049.putPath( idUsng, new File( "/Applications/Adobe Photoshop CS5/Presets/Channel Mixer/Black & White with Green Filter (RGB).cha" ) );
executeAction( idChnM, desc4049, DialogModes.NO );
var globalOpacity = 50.0;
layerGreen.opacity = globalOpacity;
//Merge layers
var idMrgtwo = charIDToTypeID( "Mrg2" );
var desc243 = new ActionDescriptor();
executeAction( idMrgtwo, desc243, DialogModes.NO );
curDoc.selection.selectAll()
curDoc.selection.copy()
curDoc.activeLayer.remove()
//paste the combined red/green channel into the red channel.
redChannel = new Array(curDoc.channels[0])
curDoc.activeChannels = redChannel
activeDocument.paste();
//paste the combined red/green channel into the green channel.
greenChannel = new Array(curDoc.channels[1])
curDoc.activeChannels = greenChannel
activeDocument.paste();
//make all three channels visible again
activeDocument.activeChannels = activeDocument.componentChannels
//save file
curDoc.flatten();
saveFile = new File("//color_blind_image.jpg");
saveOptions = new JPEGSaveOptions();
saveOptions.embedColorProfile = true;
saveOptions.formatOptions = FormatOptions.STANDARDBASELINE;
saveOptions.matte = MatteType.NONE;
saveOptions.quality = 9;
curDoc.saveAs(saveFile, saveOptions, true,Extension.LOWERCASE);
I had to use code from the script listener a couple times because I couldn't find or figure out how to do it otherwise. I used it for the channel mixer command and for merging layers.


Subscribe to:
Posts (Atom)